Flutter动画的一些试验
基本原理
在任何系统的UI框架中,动画实现的原理都是相同的,即:在一段时间内,快速地多次改变UI外观;由于人眼会产生视觉暂留,所以最终看到的就是一个“连续”的动画,这和电影的原理是一样的。我们将UI的一次改变称为一个动画帧,对应一次屏幕刷新,而决定动画流畅度的一个重要指标就是帧率FPS(Frame Per Second),即每秒的动画帧数。很明显,帧率越高则动画就会越流畅!一般情况下,对于人眼来说,动画帧率超过16 FPS,就基本能看了,超过 32 FPS就会感觉相对平滑,而超过 32 FPS,大多数人基本上就感受不到差别了。
动画的尽头是数学
Flutter抽象
为了方便开发,Flutter堆动画层进行了抽象,主要分为:
- Animation
- Curve
- Controller
- Tween
通过四者配合实现一个完整的动画。
Animation
Animation是一个抽象类,它本身和UI渲染没有任何关系,而它主要的功能是保存动画的插值和状态;其中一个比较常用的Animation类是Animation
Animation有如下两个方法:
- addListener();它可以用于给Animation添加帧监听器,在每一帧都会被调用。帧监听器中最常见的行为是改变状态后调用setState()来触发UI重建。
- addStatusListener();它可以给Animation添加“动画状态改变”监听器;动画开始、结束、正向或反向(见AnimationStatus定义)时会调用状态改变的监听器。
Curve
我们可以通过CurvedAnimation来指定动画的曲线,如:
final CurvedAnimation curve =
    CurvedAnimation(parent: controller, curve: Curves.easeIn);
常见的Curve对应表如下:
| Curves曲线 | 动画过程 |
| linear | 匀速的 |
| decelerate | 匀减速 |
| ease | 开始加速,后面减速 |
| easeIn | 开始慢,后面快 |
| easeOut | 开始快,后面慢 |
| easeInOut | 开始慢,然后加速,最后再减速 |
当然了,我们也可以自己创建Curve:
class ShakeCurve extends Curve {
  @override
  double transform(double t) {
    return math.sin(t * math.PI * 2);
  }
}
AnimationController
AnimationController用于控制动画,它包含动画的启动forward()、停止stop() 、反向播放 reverse()等方法。AnimationController会在动画的每一帧,就会生成一个新的值。默认情况下,AnimationController在给定的时间段内线性的生成从 0.0 到1.0(默认区间)的数字。
AnimationController派生自Animation
Ticker
当创建一个AnimationController时,需要传递一个vsync参数,它接收一个TickerProvider类型的对象,它的主要职责是创建Ticker。 Flutter 应用在启动时都会绑定一个SchedulerBinding,通过SchedulerBinding可以给每一次屏幕刷新添加回调,而Ticker就是通过SchedulerBinding来添加屏幕刷新回调,这样一来,每次屏幕刷新都会调用TickerCallback。使用Ticker(而不是Timer)来驱动动画会防止屏幕外动画(动画的UI不在当前屏幕时,如锁屏时)消耗不必要的资源,因为Flutter中屏幕刷新时会通知到绑定的SchedulerBinding,而Ticker是受SchedulerBinding驱动的,由于锁屏后屏幕会停止刷新,所以Ticker就不会再触发。
Tween
Tween继承自Animatable
final AnimationController controller = AnimationController(
  duration: const Duration(milliseconds: 500),
  vsync: this,
);
final Animation curve = CurvedAnimation(parent: controller, curve: Curves.easeOut);
Animation<int> alpha = IntTween(begin: 0, end: 255).animate(curve);
lerp函数
动画的原理其实就是每一帧绘制不同的内容,一般都是指定起始和结束状态,然后在一段时间内从起始状态逐渐变为结束状态,而具体某一帧的状态值会根据动画的进度来算出,因此,Flutter 中给有可能会做动画的一些状态属性都定义了静态的 lerp 方法(线性插值),比如:
//a 为起始颜色,b为终止颜色,t为当前动画的进度[0,1]
Color.lerp(a, b, t);
lerp 是线性插值,意思是返回值和动画进度t是成一次函数(y = kx + b)关系。lerp 的计算一般遵循: 返回值 = a + (b - a) * t,其它拥有 lerp 方法的类:
// Size.lerp(a, b, t)
// Rect.lerp(a, b, t)
// Offset.lerp(a, b, t)
// Decoration.lerp(a, b, t)
// Tween.lerp(t) //起始状态和终止状态在构建 Tween 的时候已经指定了
...
如果我们想让动画按照一个曲线来执行,我们可以对 t 进行映射,比如要实现匀加速效果,则 t’ = at²+bt+c,然后指定加速度 a 和 b 即可(大多数情况下需保证 t’ 的取值范围在[0,1],当然也有一些情况可能会超出该取值范围,比如弹簧(bounce)效果),而不同 Curve 可以按照不同曲线执行动画的的原理本质上就是对 t 按照不同映射公式进行映射。
动画状态监听
我们可以通过Animation的addStatusListener()方法来添加动画状态改变监听器。Flutter中,有四种动画状态,在AnimationStatus枚举类中定义:
| 枚举值 | 含义 |
| dismissed | 动画在起始点停止 |
| forward | 动画正在正向执行 |
| reverse | 动画正在反向执行 |
| completed | 动画在终点停止 |
Hero动画
Hero 指的是可以在路由(页面)之间“飞行”的 widget,简单来说 Hero 动画就是在路由切换时,有一个共享的widget 可以在新旧路由间切换。由于共享的 widget 在新旧路由页面上的位置、外观可能有所差异,所以在路由切换时会从旧路逐渐过渡到新路由中的指定位置,这样就会产生一个 Hero 动画。
实现 Hero 动画只需要用Hero组件将要共享的 widget 包装起来,并提供一个相同的 tag 即可,中间的过渡帧都是 Flutter 框架自动完成的。必须要注意, 前后路由页的共享Hero的 tag 必须是相同的,Flutter 框架内部正是通过 tag 来确定新旧路由页widget的对应关系的。
动画的插值是系统帮我们实现了。
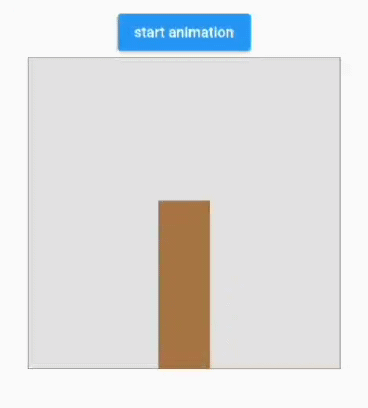
交织动画
交织动画的本质就是多个动画 Animation 组合而成,一个controller控制,每个动画指定时间间隔。下面是一个简单的例子:
开始时高度从0增长到300像素,同时颜色由绿色渐变为红色;这个过程占据整个动画时间的60%。
高度增长到300后,开始沿X轴向右平移100像素;这个过程占用整个动画时间的40%。
class StaggerAnimation extends StatelessWidget {
  StaggerAnimation({Key? key, required this.controller}) : super(key: key) {
    //高度动画
    height = Tween<double>(
      begin: .0,
      end: 300.0,
    ).animate(
      CurvedAnimation(
        parent: controller,
        curve: const Interval(
          0.0, 0.6, //间隔,前60%的动画时间
          curve: Curves.ease,
        ),
      ),
    );

    color = ColorTween(
      begin: Colors.green,
      end: Colors.red,
    ).animate(
      CurvedAnimation(
        parent: controller,
        curve: const Interval(
          0.0, 0.6, //间隔,前60%的动画时间
          curve: Curves.ease,
        ),
      ),
    );

    padding = Tween<EdgeInsets>(
      begin: const EdgeInsets.only(left: .0),
      end: const EdgeInsets.only(left: 100.0),
    ).animate(
      CurvedAnimation(
        parent: controller,
        curve: const Interval(
          0.6, 1.0, //间隔,后40%的动画时间
          curve: Curves.ease,
        ),
      ),
    );
  }

  late final Animation<double> controller;
  late final Animation<double> height;
  late final Animation<EdgeInsets> padding;
  late final Animation<Color?> color;

  Widget _buildAnimation(BuildContext context, child) {
    return Container(
      alignment: Alignment.bottomCenter,
      padding: padding.value,
      child: Container(
        color: color.value,
        width: 50.0,
        height: height.value,
      ),
    );
  }

  @override
  Widget build(BuildContext context) {
    return AnimatedBuilder(
      builder: _buildAnimation,
      animation: controller,
    );
  }
}

class StaggerRouter extends StatefulWidget {
  const StaggerRouter({Key? key}) : super(key: key);

  @override
  State<StatefulWidget> createState() {
    return _StaggerRouteState();
  }
}

class _StaggerRouteState extends State<StaggerRouter>
    with TickerProviderStateMixin {
  late AnimationController _controller;

  @override
  void initState() {
    super.initState();
    _controller = AnimationController(
      vsync: this,
      duration: const Duration(milliseconds: 2000),
    );
  }

  _playAnimation() async {
    try {
      await _controller.forward().orCancel;
      await _controller.reverse().orCancel;
    } on TickerCanceled {
      _controller.reset();
    }
  }

  @override
  Widget build(BuildContext context) {
    return Scaffold(
      appBar: AppBar(
        title: const Text("StaggerAnimation"),
      ),
      body: Center(
        child: Column(
          children: [
            ElevatedButton(
              onPressed: () => _playAnimation(),
              child: const Text("start animation"),
            ),
            Container(
              width: 300.0,
              height: 300.0,
              decoration: BoxDecoration(
                color: Colors.black.withOpacity(0.1),
                border: Border.all(
                  color: Colors.black.withOpacity(0.5),
                ),
              ),
              //调用我们定义的交错动画Widget
              child: StaggerAnimation(controller: _controller),
            ),
          ],
        ),
      ),
    );
  }
}
动画切换组件
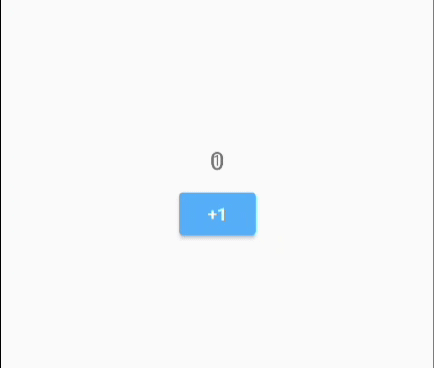
AnimatedSwitcher 可以同时对其新、旧子元素添加显示、隐藏动画。也就是说在AnimatedSwitcher的子元素发生变化时,会对其旧元素和新元素做动画,AnimatedSwitcher 的定义:
const AnimatedSwitcher({
  Key? key,
  this.child,
  required this.duration, // 新child显示动画时长
  this.reverseDuration,// 旧child隐藏的动画时长
  this.switchInCurve = Curves.linear, // 新child显示的动画曲线
  this.switchOutCurve = Curves.linear,// 旧child隐藏的动画曲线
  this.transitionBuilder = AnimatedSwitcher.defaultTransitionBuilder, // 动画构建器
  this.layoutBuilder = AnimatedSwitcher.defaultLayoutBuilder, //布局构建器
})
defaultTransitionBuilder默认使用了FadeTransition对象,也就是渐隐渐显效果。
官方一个例子:
使用方式:
    AnimatedSwitcher(
      duration: const Duration(milliseconds: 500),
      transitionBuilder: (Widget child, Animation<double> animation) {
        //执行缩放动画
        return ScaleTransition(child: child, scale: animation);
      },
      child: Text(
        '$_count',
        //显示指定key,不同的key会被认为是不同的Text,这样才能执行动画
        /// If the widgets have no key (their key is null), then they are considered a
        /// match if they have the same type, even if their children are completely
        /// different.
        key: ValueKey<int>(_count),
      ),
    ),
从上面的使用方式我们可以看到:当child发生变化时(子 widget 的 key 或类型不同时则认为发生变化,则重新会重新执行build,然后动画开始执行。
AnimatedSwitcher实现的部分核心伪代码如下:
Widget _widget;
void didUpdateWidget(AnimatedSwitcher oldWidget) {
  super.didUpdateWidget(oldWidget);
  // 检查新旧child是否发生变化(key和类型同时相等则返回true,认为没变化)
  if (Widget.canUpdate(widget.child, oldWidget.child)) {
    // child没变化,...
  } else {
    //child发生了变化,构建一个Stack来分别给新旧child执行动画
   _widget= Stack(
      alignment: Alignment.center,
      children:[
        //旧child应用FadeTransition
        FadeTransition(
         opacity: _controllerOldAnimation,
         child : oldWidget.child,
        ),
        //新child应用FadeTransition
        FadeTransition(
         opacity: _controllerNewAnimation,
         child : widget.child,
        ),
      ]
    );
    // 给旧child执行反向退场动画
    _controllerOldAnimation.reverse();
    //给新child执行正向入场动画
    _controllerNewAnimation.forward();
  }
}

//build方法
Widget build(BuildContext context){
  return _widget;
}
上面伪代码展示了AnimatedSwitcher实现的核心逻辑,当然AnimatedSwitcher真正的实现比这个复杂,它可以自定义进退场过渡动画以及执行动画时的布局等。在此,我们删繁就简,通过伪代码形式让读者能够清楚看到主要的实现思路,具体的大家可以参考AnimatedSwitcher源码。
比如,我们要实现一个数字左出右进的效果,如下:
AnimatedSwitcher(
  duration: Duration(milliseconds: 200),
  transitionBuilder: (Widget child, Animation<double> animation) {
    var tween = Tween<Offset>(begin: Offset(1, 0), end: Offset(0, 0))
     return SlideTransition(
       child: child,
       position: tween.animate(animation),
    );
  },
  ...//省略
)
直接这样写是有问题的,因为旧child,reverse()会导致数字是从右边出去。所以要做略微修改:
///...
if (position.status == AnimationStatus.reverse) {
  offset = Offset(-offset.dx, offset.dy);
}
///...
再进一步,如果我们需要各个方向的动画,每个都实现一遍是很不好的,也不合理。所以便有了下面的代码:
class SlideTransitionX extends AnimatedWidget {
  SlideTransitionX({
    Key? key,
    required Animation<double> position,
    this.transformHitTests = true,
    this.direction = AxisDirection.down,
    required this.child,
  }) : super(key: key, listenable: position) {
    switch (direction) {
      case AxisDirection.up:
        _tween = Tween(begin: const Offset(0, 1), end: const Offset(0, 0));
        break;
      case AxisDirection.right:
        _tween = Tween(begin: const Offset(-1, 0), end: const Offset(0, 0));
        break;
      case AxisDirection.down:
        _tween = Tween(begin: const Offset(0, -1), end: const Offset(0, 0));
        break;
      case AxisDirection.left:
        _tween = Tween(begin: const Offset(1, 0), end: const Offset(0, 0));
        break;
    }
  }

  final bool transformHitTests;

  final Widget child;

  final AxisDirection direction;

  late final Tween<Offset> _tween;

  @override
  Widget build(BuildContext context) {
    final position = listenable as Animation<double>;
    Offset offset = _tween.evaluate(position);
    if (position.status == AnimationStatus.reverse) {
      switch (direction) {
        case AxisDirection.up:
          offset = Offset(offset.dx, -offset.dy);
          break;
        case AxisDirection.right:
          offset = Offset(-offset.dx, offset.dy);
          break;
        case AxisDirection.down:
          offset = Offset(offset.dx, -offset.dy);
          break;
        case AxisDirection.left:
          offset = Offset(-offset.dx, offset.dy);
          break;
      }
    }
    return FractionalTranslation(
      translation: offset,
      transformHitTests: transformHitTests,
      child: child,
    );
  }
}
效果如下: